

Table of contents
Hello, fellow Reactêrs!! Welcome to the second article in our series on React. If you haven't read the first article on props, we recommend doing so since useState builds on the concepts covered in that article. In this article, we'll introduce useState, a powerful React hook that allows you to manage state in functional components.
Introduction: What is useState in React?
Before I dive deep into explaining the meaning of useState, I'd like to ask you some questions. Before you started learning React, I'll assume that you had already learned JavaScript or TypeScript. And when building those beautiful websites, you definitely added some interactivity, right? For example, you might have added interactivity to your navigation section on mobile screens, where a hamburger icon appears while the links are displayed as a flexbox on larger screens. Or perhaps you've added onClick events to buttons that open a modal or change the text and color of a paragraph. Let's take an even simpler example: the increment and decrement buttons that are very common on shopping websites. You need to click on the increment button to increase the quantity of your product, or the decrement button to decrease it.
<!DOCTYPE html>
<html>
<body>

<h1 class="product-quantity">0</h1>

<button onclick="increment()">Increase</button>

<button onclick="decrement()">Decrease</button>

<script>
const productQuantity = document.querySelector(".product-quantity");

let count = 0;
const increment = () => {
    count++;
      productQuantity.textContent = count;
}

const decrement = () => {
  count--;
  productQuantity.textContent = count;
}
</script>
As you can see from the code above, we have an increment and decrement button. Two functions were created and added to the buttons onClick event and when that event happens, they affect the textContent of the h1 element. It's as easy as that. But in React, it is done differently. At first glance, using useState in React might seem challenging, but it's actually simpler than the equivalent JavaScript implementation.
In React, you cannot use DOM manipulation methods like querySelector or getElementById to update the state of an element in React. The example above shows how this can be done in plain JavaScript, but React requires a different approach. The state, which in this case is the textContent of the h1 element is being changed on onClick event. In order to make something like this work, we'd need to use a react Hook called useState.
The complicated definition of useState is that useState() is a React Hook that allows you to create, track and update a state in functional components. In simple terms, useState gives you the ability to be able to affect, change and update the state of a component. Remember that components are basically functions that always return an element. This React Hook is what you'd need to use if you want to display your navigation links when you click a hamburger button or if you'd like to have a modal display onclick of a button or even the increment and decrement buttons that affect another element.
Why is state important in building React applications?
State is very important in React because it gives you the ability to manage and store your data and remember data changes a lot of times. You can also refer to state in this case as a variable. Remember that in React, the user interface is broken into small reusable components that have their own functionality and data. Each of those data is stored in a state and whenever the data changes, the state changes too which React will then automatically update the component and any child component that uses that state without you needing to refresh the page.
Let's take a closer look at our example code for the increment and decrement buttons from earlier. In React, changing the value of the h1 element using state is incredibly simple. All you need to do is save the current state of the value and update the state whenever a button is clicked.
In contrast, using JavaScript like in the example above, you would need to select the element that would be affected by the click event, select the two buttons, create a variable to store the initial state or value, and finally create the two functions. That's a lot of work!
But with useState in React, managing state becomes incredibly easy. Instead of all those steps, you simply call the useState hook and pass in the initial state value. useState then returns an array with two elements: the current state value and a function to update that value.
So, with useState, you can easily implement interactive features like increment and decrement buttons that affect another element's state. Overall, useState is a powerful tool that simplifies state management in React and makes it easy to build dynamic and interactive user interfaces.
How to use useState in a React component
The concept of useState is very easy to understand especially if you're very proficient in the ES6 modules of JavaScript. The syntax for useState is very easy too.
const [count, setCount] = useState(0);
Does this syntax look familiar to you? I'm sure you're thinking right now that yes it does, but probably you can't remember where you've seen or if you've used it. For those very conversant with the ES6 JavaScript syntax, you'll know what I'm going to say next. Well, this syntax is the ES6 way of destructuring an array. The first element in the array is the initial state value which in this case is 0. This means that at the initial state or at the first render of the DOM, the count value is 0 count = 0. While the second element is the state function. This is where we can pass in an argument to update the initial state value.
Let's say we want to update the state value to 5 on click of a button, we would pass in the value as an argument and put the setCount function as the callback function onclick of the button.
import { useState } from "react"

const UseState = () => {
    let [count, setCount] = useState(0);

  return (
    <>
        <h1>Current count is: {count}</h1>
        <button onClick={() => setCount(5)}>
            Click me
        </button>
    </>
  )
}
export default UseState

This is the count of h1 before the button is clicked. When we click the button, the value of the h1 is updated accordingly to the current count value which is 5.

So let's implement the increment functionality that was done with JavaScript at the beginning of this article.
import { useState } from "react"

const UseState = () => {
    let [count, setCount] = useState(0);

    const increment = () => {
        count ++;
        setCount(count);
    }

  return (
    <>
        <h1>Current count is: {count}</h1>
        <button onClick={() => increment()}>
            Click me
        </button>
    </>
  )
}
export default UseState
What we just did was create a function and increment the count by 1 whenever the button is clicked.
Using useState with different data types
You can pass in different data types as an argument to useSatate. It does not only accept numbers. You can pass in strings, boolean, arrays, and objects.
Using useState with strings
You can decide to pass in a string as the argument for the useState. There are different scenarios for this, let's use a loader button as an example. You can use useState to change the textContent to indicate that the button is loading.
import { useState } from "react"

const UseState = () => {
    let [loading, setLoading] = useState("Click me");

  return (
    <>
        <h1>Current count is: {count}</h1>
        <button onClick={() => setLoading("Loading")}>
            {loading}
        </button>
    </>
  )
}
export default UseState

When the button is clicked, the text changes to Loading.

Using useState with booleans
Most React developers use the boolean method if they want to display their navigation links on click of the hamburger button. They set the initial toggle value to false and onClick of the button, they negate the initial value which will toggle the boolean to true or false. Implementing that would be too complicated for this article so we're just going to be adding some styles to some elements onClick.
h4{
    text-align: center;
    font-weight: 700;
}

button{
    border-radius: 15px;
    padding: 8px 20px;
    text-align: center;
}

.text-center{
    text-align: center;
}

.h4-not-coloured{
    color: navy;
}

.h4-coloured{
    color: hotpink;
}

.not-loading-btn{
    background-color: #1fc6ac;
    color: white;
}

.loading-btn{
    color: white;
    background-color: grey;
}
These are the styles to be applied for when the button has not been clicked and when it has.
import { useState } from "react"
import '../index.css'

const UseState = () => {
    const [color, setColor] = useState(false);

    const textColor = color ? "h4-coloured" : "h4-not-coloured";
    const btnColor = color ? "loading-btn" : "not-loading-btn";
    const btnText = color ? "Text color changed" : "Change text color";

  return (
    <>
      <h4 className={textColor}>Hey there! Welcome to useState in React</h4>
      <div class="text-center">
        <button className={btnColor} onClick={() => setColor(!color)}>
          {btnText}
        </button>
      </div>
    </>
  )
}
export default UseState
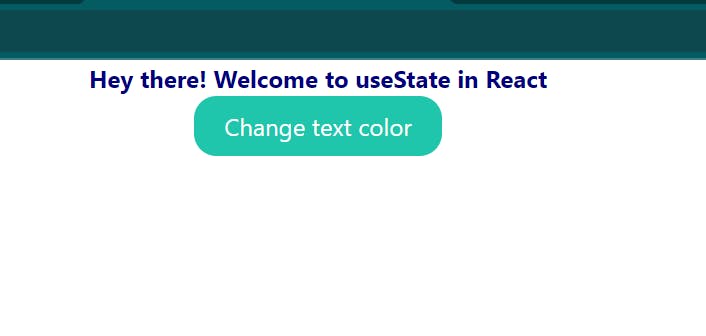
From the code snippet above, the objective is to change the color of the button, the text content of the button, and the color of the h4 element when it is clicked.
The first thing we do is that we set the initial color to false. Then we create three ternary operators. One to change the h4 text color, another for the button color, and then the button text. We're checking if the color is true. If the condition is true, then the first statement runs else, the second runs. And we save the values of the ternary operators to variables. Then we put the variable in classname for both the button and h4 since we want to change the class. Then to change the text of the button, we put the variable inside of the button's textContent.
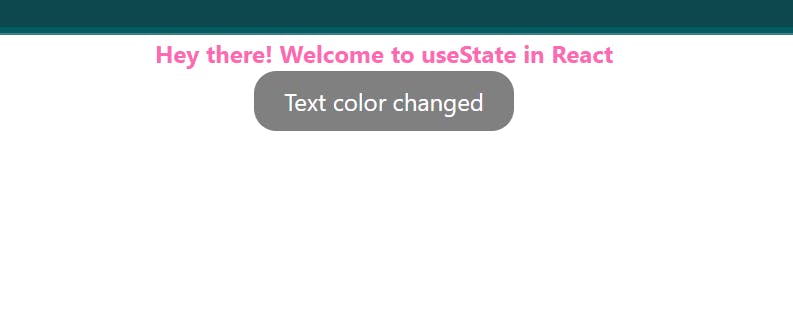
In order for these changes to occur, we would need to find a way to toggle the state of color which we do by negating the color variable inside of the state function setcolor. This is because every time the click event occurs, it checks against the previous state and sets it to the opposite of that and since our initial state is false, it will change to true.
Before button click
After the button is clicked.
Using useState with arrays
In this example, we're going to implement a kind of add items to cart. in such a way that when a button is clicked, an item gets added to the previous items which is then displayed on the browser.
import { useState } from "react"
import '../index.css'

const UseState = () => {
  const [items, setItems] = useState([]);

  const addToCart = () => {
    setItems([...items, `Item ${items.length + 1}`]);
  }

  return (
    <div className="text-center">
      <button onClick={addToCart}>Add Item</button>
      <ul>
        {items.map((item, index) => (
          <li key={index}>{item}</li>
        ))}
      </ul>
    </div>
  );
}
export default UseState
We first set the initial state of the cart which is going to be empty, that's why we have an empty array there. If you console.log(items) at this point, it would give you an empty array. Then we create a function called addTocart and inside the function, we update the state function. Remember we had an empty array and that this function is to be called when the button is clicked. So we use a spread operation to spread whatever elements we had inside of the array before and we also add a new element Item ${items.length + 1} . What this does is that it checks the length of the array, adds 1 to it, and appends it to the Item string . This would return either Item 1, Item 2 , etc.
Now add the function to the onClick event in the button. Next, we map through the items array and append the li element every time the button is clicked and the textContent is the value inside of the array. Remember when I mention Item 1, Item 2 etc, that is what is going to be the textcontent of the li elements. Then we set the key to the index since it's going to be unique for every item.
No list item is going to display at first because our array is empty.

When you keep clicking on the button, the li elements keep increasing.

Using useState with objects
We're going to change the email of the properties in an object. This is to show that objects can be used directly with useState
import { useState } from "react"
import '../index.css'

const UseState = () => {
  const [person, setPerson] = useState({
    name: 'John Doe',
    age: 30,
    email: 'johndoe@example.com',
  });

  const handleUpdateEmail = () => {
    setPerson({
      ...person,
      email: 'newemail@example.com',
    });
  }
  const {name, age, email} = person;
  return (
    <div>
      <p>Name: {name}</p>
      <p>Age: {age}</p>
      <p>Email: {email}</p>
      <button onClick={handleUpdateEmail}>Update Email</button>
    </div>
  );
}
export default UseState
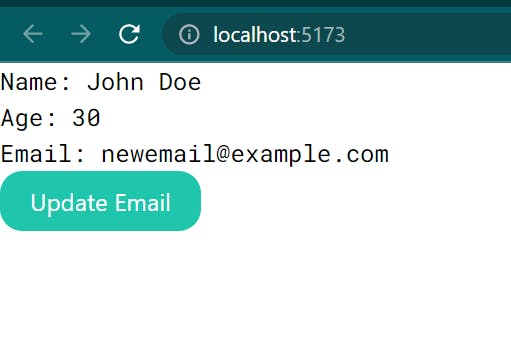
We, first of all, set the initial value to an object with different key value and then we create the handleUpdateEmail function that would be called onClick of a button. Inside the function, we update the state function setPerson by using the spread operator to expand all the other properties and then we change the value of the email. Before the return statement, we spread the object and get each of its values and those values are set to the textContent of the elements. The handleUpdateEmail function is called anytime the button is clicked.
Before the button is clicked.

After the button is clicked. Notice that the email changes.
Conclusion
If you want your React applications to be functional and interactive, understanding the principles of State is very important. In this article, we have covered a lot of things about useState. We talked about what useState is in React and why it is important. We've also discussed how to use useState in React with different data types such as numbers, strings, boolean, arrays and objects.
I hope you enjoyed reading this article as much as I enjoyed writing it, and even more. Keep learning and building with React!